ASP.NET : DataBound Controls – Details View
In this tutorial you will learn DetailView DataBound Control, To create a file system Web site, Connecting to SQL Server, Use a Drop-Down List as the Master and To test the drop-down list.
The DetailsView is a control that is complementary to the GridView control. It has been introduced in ASP.NET 2.0 to provide an ability to work with a single record or row from an associated data source. The default view of this control is vertical with each column of the record displayed on a line of its own. It is used for updating and inserting new records and used often in the Master-details scenario where the details of the record selected in the master is displayed in detail.
The DetailsView, like the GridView rides on the data source capabilities to update, insert or delete rows. It renders a single data item at a time even when the data source exposes more items. If the data object represents the ICollection interface or the underlying data source exposes the paging operation, the DetailsView can page over the data, provided the AllowPaging property is set to true. Users can also navigate between rows of data using this control.
The process of binding the DetailsView control to a data source is very simple. The DataSourceID property can be set declaratively or programmatically.
The AutoGenerateEditButton property, if set to True, enables editing operations and the DetailsView renders the edit button in addition to the other columns in the control. The Edit mode can be invoked pressing this button. The Edit user interface can be customized using Styles, DataControlField objects and templates.
The DetailsView control can be configured to display a Delete and insert button also. The AutoGenerateInsertButton, when set to true, generates a New button. The new button invokes the insert mode and appropriate user interfaces are rendered including the fields in the DataKeyNames collection. Using this collection the data source control can locate the unique row to be updated.
The DetailsView control user interface can be customized using Style properties such as HeaderRowStyle, RowStyle, AlternatingRowStyle and so on. Templates also can be used to customize this control. EmptyDataTemplate, HeaderTemplate, FooterTemplate and PagerTemplate are some of the templates available for this control.
A number of events can be used to customize the code including pre and post insert, update and delete data source events. This includes ItemCreated and ItemCommand events. There is no selected event in the DetailsView control as the current event is treated as the selected event.
The Control can also be used for rendering mobile devices.
Let us explore the potential of using DetailsView control by creating and executing a page that has such a control on it.
To create a file system Web site
1. Open Visual Web Developer.
2. On the File menu, click New Web Site.
3. The New Web Site dialog box appears.
4. Under Visual Studio installed templates, click ASP.NET Web Site.
5. In the Location box, enter the name of the folder where you want to keep the pages of your Web site.
6. In the Language list, select C#.
7. Click OK.
8. Visual Web Developer creates the folder and a new page named Default.aspx.
Connecting to SQL Server
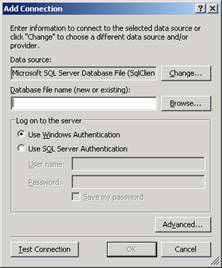
1. In Server Explorer (Database Explorer), right-click Data Connections and choose Add Connection.
2. The Connection Properties dialog box is displayed:
3. Do the following:
…….a. Enter or select the name of the SQL Server
…….bb. Click Browse and select ExForSys as the database.
4. Click Test Connection, and if it works, click OK.
5. When finished, click OK.
6. The connection is added to Server Explorer.
Using a Drop-Down List as the Master
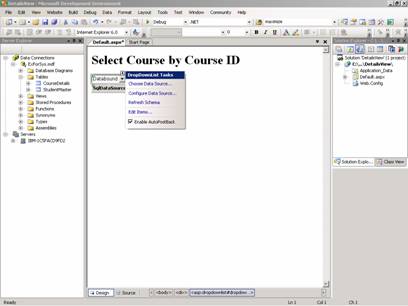
1. Switch to or open the Default.aspx page.
2. Switch to Design view.
3. Type Select Course by CourseId in the page and format the text as a heading.
4. From the Standard group in the Toolbox, drag a DropDownList control onto the page.
5. In the smart tag panel, select the Enable AutoPostBack check box.
{mospagebreak}
.
.
.
6. This configures the control so that it causes the page to post back to the server whenever a selection is made from the list, rather than waiting until the user clicks a button.
7. In the smart tag panel, select Choose Data Source.
8. The Choose Data Source wizard starts.
9. In the Select a data source list, click < New Data Source >.
10. The Data Source Configuration dialog box is displayed:
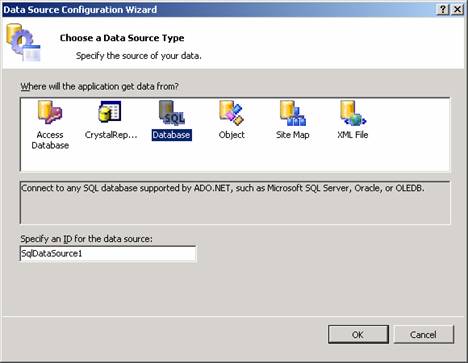
11. Select Database.
12. This specifies that data is to be fetched from a database that supports SQL statements. (This includes SQL Server and other OLE-DB-compatible databases.)
13. In the Specify an ID for the data source box, a default data source control name is displayed (SqlDataSource1).
14. Click OK.
15. The wizard displays a page where a connection has to be selected:
16. From the Choose a data connection list, select the connection created earlier.
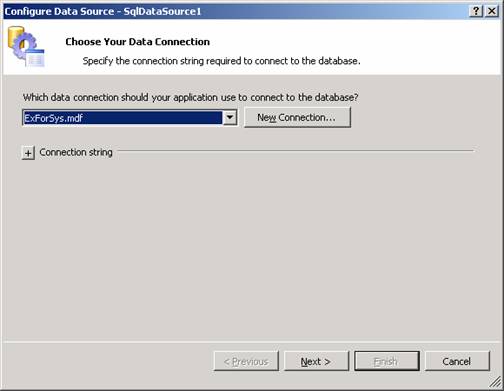
17. Click Next.
18. The wizard displays a page where you can choose to store the connection string in the configuration file.
{mospagebreak}
.
.
.
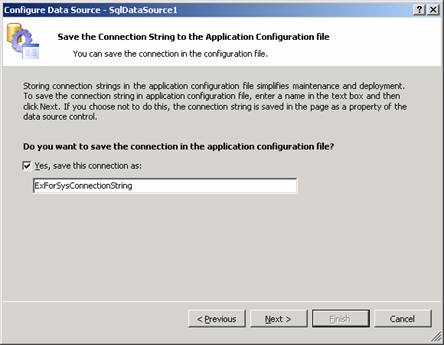
19. Be sure the Yes, save this connection as check box is selected, and then click Next.
20. The wizard displays a page where you can specify what data you want to fetch from the database:
21. From the Name list under Table or View Options, select CourseDetails.

22. In the Columns box, check CourseId and CourseName.
23. Click Next.
24. Click Test Query to be sure that you are getting the data you want.

25. Click Finish.
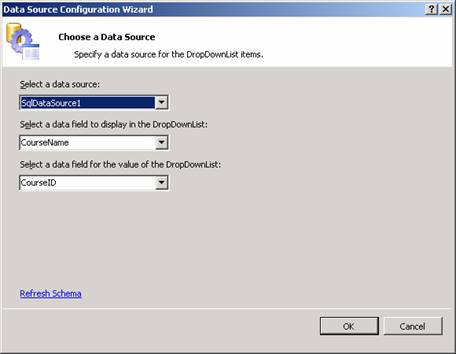
26. The Choose Data Source dialog box is displayed, with the name of the data source control you have configured displayed.
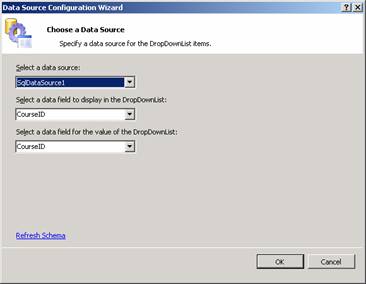
27. From the Select a data field to display in the DropDownList list, select CourseName.
28. This specifies that the value of the CourseName field will be displayed as the text of the items in the drop-down list.
29. From the Select a data field for the value of the DropDownList list, select CourseId.
30. This specifies that when an item is selected, the CourseId field will be returned as the value of the item.
31. Click OK.
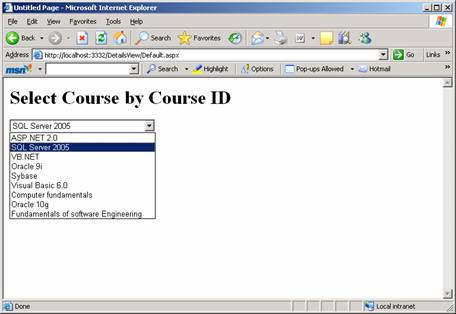
32. Before proceeding, test the drop-down list.
To test the drop-down list
1. Press CTRL+F5 to run the page.
2. When the page is displayed, examine the drop-down list.
3. Select a category to be sure that the list performs a post-back.
[catlist id=179].