ASP.NET Creating Web Wizards
In this tutorial you will learn about Rich Controls and Services, Creating Web Wizards, Working with the Wizard Control, Editing Wizard Steps, Adding a Completion Step, To edit the completion step, To show the user’s data and Testing Wizard Control.
Rich Controls and Services
ASP.NET 2.0 comes packaged with a number of goodies. A rich set of controls and services are a bonus to both the developer and the end user. Wizards, image generators and site navigation functions and counters are a few features that have been added.
In this lesson we shall be looking in some depth at the Wizard control, the image generation control and the Site navigation control and counters.
Creating Web Wizards
The new Wizard control has been introduced with an intention to simplify the task of getting user inputs over a series of forms. The interconnected forms break up data collection taking care to provide for navigation controls between forms; to ensure persistence of data and state management. The Wizard control provides for linear and nonlinear navigation and customization of the navigation mechanism with no coding. The user can move through the form sequentially, skip a step or move backwards and forwards over a number of steps to complete the forms. The steps delineate different sections of user data input. Each step within the control is a StepType. Different controls can be added to the Wizard forms. The Complete Step makes all the data accessible. The code would look something like the one shown below:
< asp:Wizard ID="Wizard1" Runat="server" >
< WizardSteps >
< asp:WizardStep Runat="server" Title="Step 1" >
< / asp:WizardStep >
< asp:WizardStep Runat="server" Title="Step 2" >
< / asp:WizardStep >
< / WizardSteps >
< / asp:Wizard >
Within the steps users can add controls, labels and accept user data. The control helps manage the display of the steps and maintenance of the data collected.
The linear and nonlinear navigation over the steps of the Wizard control is a function of the Control’s State Management. The sidebar provided for the purpose helps the user navigate to the different screens. The navigation can be customized using the NexStepButtonText, PreviousStepButtonText and FinishStepButtonText attributes.
< asp:Wizard ID="Wizard1" Runat="server"
NextStepButtonText=" Next > > "
PreviousStepButtonText=" < < Previous "
FinishStepButtonText=" Done! " >
The Wizard displays a title and the control’s current step. The Title can be customized using the HeaderText property. The header template can be changed using the HeaderTemplate property. A cancel button can be displayed by setting the DisplayCancelButton property to true. All buttons can be set to display a common style using the NavigationButtonStyle property or each button can be given an individual look and feel. The control’s templates can be further customized using the StartNavigationTemplate, FinishNavigationTemplate and SideBarTemplate properties.
The behavior of the Wizard control can also be customized programmatically. For instance the NextButtonClick event captures the current user input and the WizardNavigationEventArgs parameter is passed to it. The CurrentStepIndex and NextStepIndex properties of this parameter become available to it and the user can customize the event by setting these properties and determining the behavior of the control when the button is clicked. Similarly the Previous and Finish buttons can also be customized.
Working with the Wizard Control
1. Switch to Design View for Default.aspx.
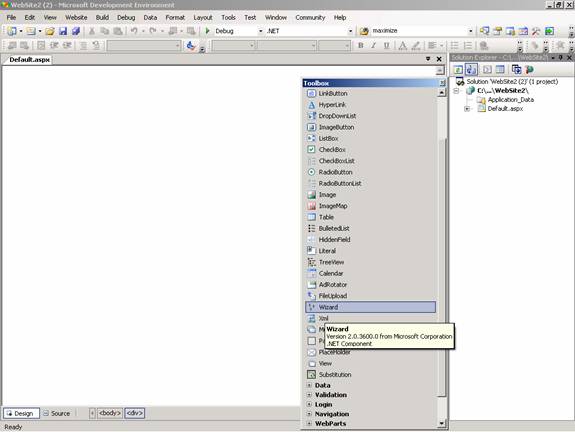
2. From the Standard group of the Toolbox, drag a Wizard control onto the page.
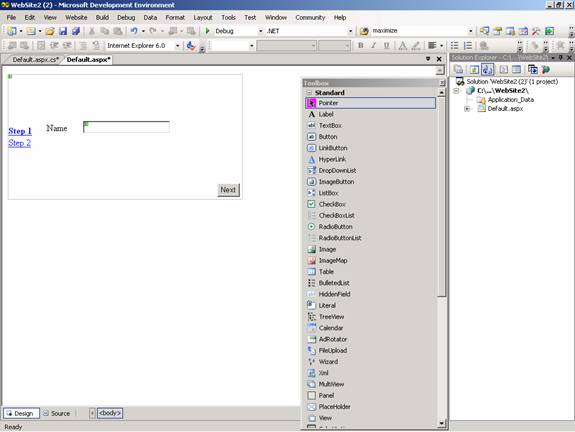
3. The control appears with two stubbed-out steps already in place. Clicking the steps allows you to edit the text and controls displayed during that step.

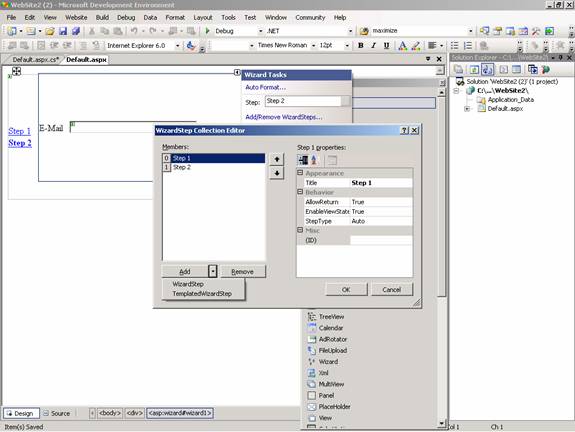
Editing Wizard Steps
When the Wizard control is dragged onto the page, it shows two default steps in place. We shall edit both the step and also add a completion step to the wizard.
To edit the first Wizard step
1. Click the underlined text "Step 1" in the Wizard control.
2. Click the edit area (the text that says Click here to edit the active Wizard step).
3. Type the word Name:
4. Drag a TextBox control onto the active area of the wizard control, next to the text just typed.
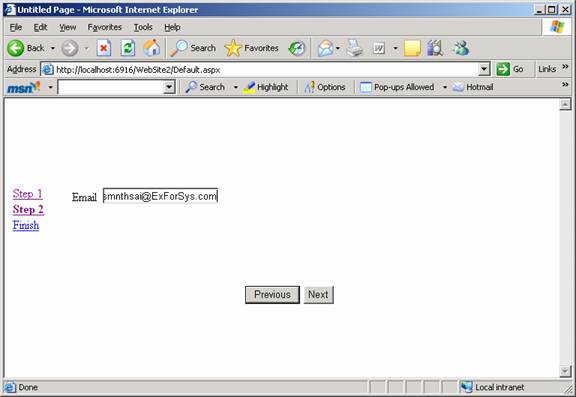
To edit the second wizard step
1. Click Step 2 in the Wizard control.
2. Click the edit area (the text that says Click here to edit the active Wizard step).
3. Type Email:.
4. Drag a TextBox control onto the active area of the wizard control, next to the e-mail label.
5. Save the file.
Adding a Completion Step
The Complete step has no navigational options.
To add a completion step
1. Right-click the Wizard control.
2. Choose Show Smart Tasks.
3. In the Common Wizard Tasks dialog box choose Add/Remove Wizard Steps.
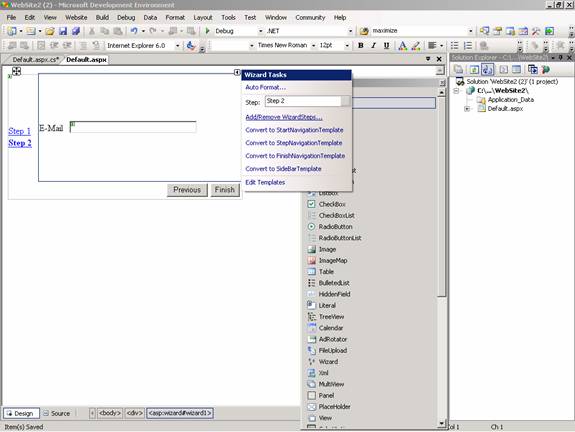
4. The WizardStep Collection Editor appears.
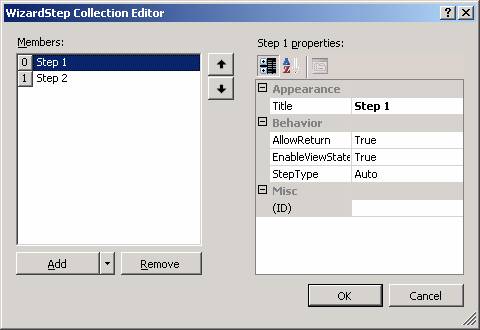
5. From the Add drop-down list, select Wizard Step.
{mospagebreak}
.
.
6. The Properties area now shows the new step.
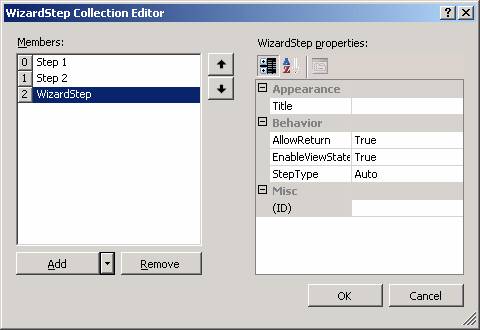
7. Set the Title property to Finished.
8. Set the StepType property to Complete.
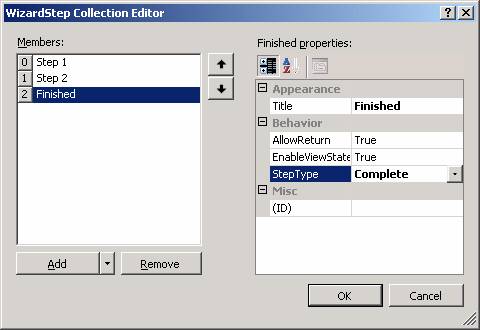
9. Click OK.
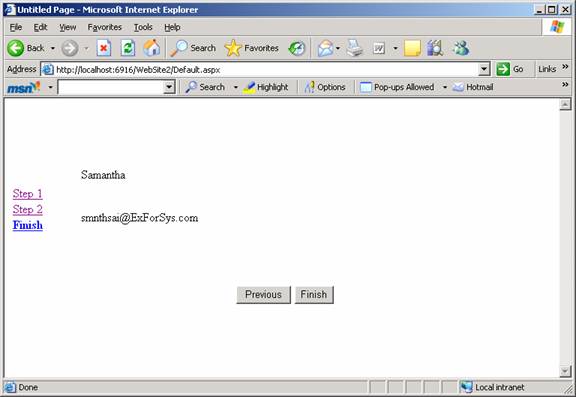
The New completion step can now be edited. We shall configure the data entered by the user in the previous two steps.
To edit the completion step
1. Right-click the Wizard control and choose Show Smart Tasks.
2. In the Common Menu Tasks dialog box, use the Step drop-down list to choose the Finish step.
3. Drag a Label onto the control, leaving the default name of Label1.
4. Drag another Label onto the control, leaving the default name of Label2.
5. Save the file.
The completion step will display the data entered by the user. Use the page’s Load event to assign the values from the first two steps onto the labels added to the completion step.
To show the user’s data
1. Open Default.aspx.cs
2. On the objects drop-down list, choose (Page Events).
3. On the events drop-down list, choose Load.
4. In the method that is stubbed out for you, add the following highlighted code:
void Page_Load(Object sender, System.EventArgs e)
{
Label1.Text = TextBox1.Text;
Label2.Text = TextBox2.Text;
}
5. Save the file.
Testing the Wizard Control
1. Press CTRL+F5.
2. Type a name in the name TextBox control for Step 1.
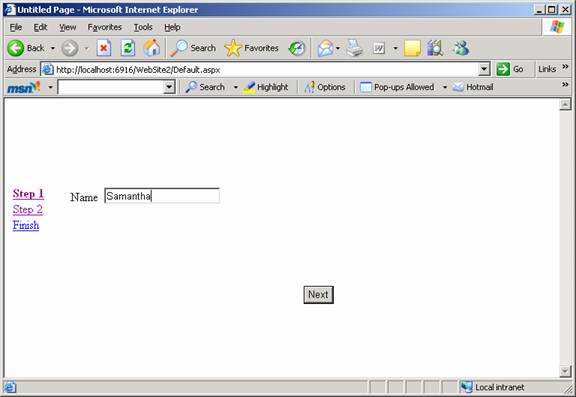
3. Click Next.
4. Type an e-mail address e-mail TextBox control for Step 2.
5. Click Finish. The developer can set some action to be performed when the button is clicked by defining an event handler for the button.
It must be noted that the entire project has been deployed with the least amount of code. It is also indicative of the quality of services that Microsoft aims to provide its developers and users.
In the next section of the tutorial we shall explore the potential of the DynamicImage Control.
[catlist id=179].