Displaying Master-Detail Data on Separate Pages
In this tutorial you will learn how to display Master-Detail Data on Separate Pages, create the details page, test the pages and Allow Editing, Deleting, and Inserting Using a DetailsView DataBound control.
A variation of the GridView and DetailsView control is the display on separate pages. Each record has an hyperlink which enables them to navigate to a second page where they can view the detail records in a DetailsView control
1. Add a new page to the Web site and name it MasterCourses.aspx.
2. Switch to Design view.
3. Type Courses in the page and format the text as a heading.
4. From the Data folder of the Toolbox, drag a GridView control onto the page.
5. In the smart tag panel, from the Connect to Data Source list choose < New Data Source > and then use the wizard to do the following:
a. Click Database.
b. Connect to the ExForSys database.
c. Retrieve the CourseId, CourseName and CourseDuration columns from the CourseDetails table.
6. Optionally, in the smart tag panel select the Enable paging check box.
7. In the smart tag panel, choose Edit Columns.
8. The Fields dialog box is displayed.
9. Clear the Auto-Generate Fields check box.
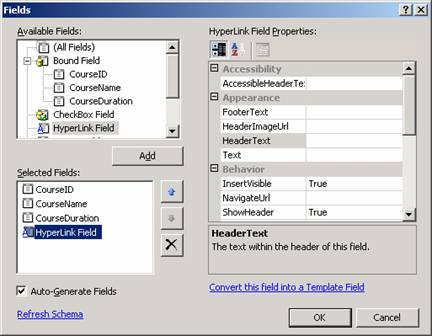
10. Under Available Fields, choose HyperLink Field, click Add, and then set the following properties:
Property |
Value |
Text |
Details |
|
DataNavigateUrlFields |
CourseIdThis indicates that the hyperlink should get its value from the CourseId column |
|
DataNavigateUrlFormatString |
DetailsCourse.aspx?CourseId={0}This creates a link that is hard-coded to navigate to the DetailsCourse.aspx page. The link also passes a query string variable named CourseId whose value will be filled using the column referenced in the DataNavigateUrlField property. |
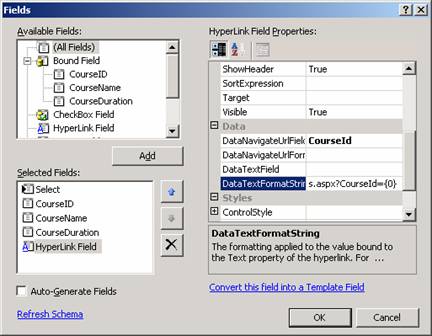
Click OK to close the Fields dialog box.
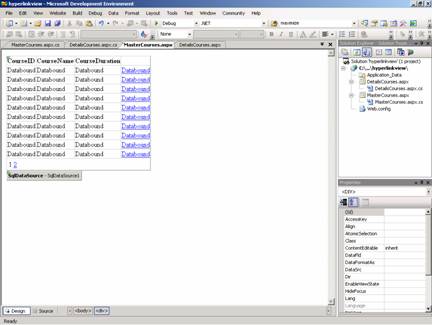
The details page can now be created that accepts a value from the master page. It should look like the screenshot here:
{mospagebreak}
To create the details page
1. Add a new page to the Web site and name it DetailsCourse.aspx.
2. Switch to Design view.
3. Type Students in the page and format the text as a heading.
4. From the Data folder of the Toolbox, drag a GridView control onto the page.
5. In the smart tag panel, from the Choose Data Source list choose < New Data Source >.
6. In the Select a data source type list, click Database and then click OK.
7. From the Choose a data connection list, select the connection you created and stored earlier.
8. Click Next.
9. The wizard displays a page where you can create a SQL statement.
10. From the Name list under Table or View Options, select CourseDetails.
11. In the Columns box, check StudentId, StudentName and CourseId.
12. Click WHERE.
13. From the Columns list, select CourseId.
14. From the Operators list, select =.
15. From the Source list, select QueryString.
16. This specifies that the query will select records based on the value passed into the page with the query string.
17. Under Parameter Properties, in the QueryString field box, type CourseId.
18. The query will get the CourseId value from the query string, which is created when you click a Details link in the MasterCourses.aspx page.
19. Click Add.
20. Click OK to close the Add WHERE Clause dialog box.
21. Click Next, and then click Finish to close the wizard.
22. From the Standard node of the Toolbox, drag a Hyperlink control onto the page. Set its Text property to Return to Courses and its NavigateUrl property to MasterCourses.aspx.
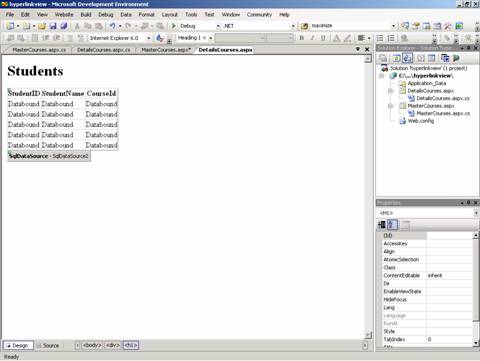
The Master-details pages can now be tested. The DetailsCourses.aspx design screen should look as under.
To test the pages
1. Switch to the MasterCourses.aspx page.
2. Press CTRL+F5 to run the page.
3. Click the Details link for a coursedetails.
4. The browser displays the DetailsCourse.aspx page with course for the selected courseid. Note that the URL in the browser’s Address box is: DetailsCourses.aspx?CourseId=xxx. Where xxx is the ID of the course selected.
5. Click the Return to courses link, select a different course, and click the Details link again to test that you can view courses for any student.
Allowing Editing, Deleting, and Inserting Using a DetailsView Control
1. Right-click the DetailsView control and then click Show Smart Tag.
2. On the Common DetailsView Tasks menu, select Enable Inserting, Enable Editing, and Enable Deleting boxes.
In this section of the tutorial we have explored the DetailsView control and used it in combination with the GridView to view data from different tables on the same page or on different pages. The potentiality of use is limited only to the imagination of the user.
In the next section of this tutorial we shall be examining the FormsView control in detail.
[catlist id=179].