Tutorial 14: MSAS : Building the Cube Part #3
The next dimension that we need to create is the Time dimension. This is the most common dimension and inevitably forms a dimension of every cube. However, there are certain specific conditions that arise when we create the time dimension. In the Select Dimensions dialog box of the Cube Wizard we will chose time_by_day dimension table. The time dimension table is usually joined to the fact table by a time_id key.

On clicking Next we are prompted to select the type of dimension. This dialog is presented whenever the wizard senses a time or date column within the table selection provided. If there are multiple date columns, the user is given the opportunity to select the column on which to drive the date dimension. Else a drop down box defaults to a single available date column. In the current exercise we will not change the value in the drop down box but will select the time dimension radio button.

Clicking Next on the above screen will take the user to ‘Create the time dimension levels’ dialog box. The Wizard offers a number of date hierarchy options to the user. The beginning day, month of the year also can be specified. These settings are valuable in building cubes for organizations that follow the fiscal year.

The Wizard does not allow the user select date dimension levels. Hence the Advanced options dialog can be skipped and we click through to the Finish the Dimension wizard.


On clicking finish we will see the Time dimension added to the dimensions of the cube

The process of adding a store dimension and a customer dimension are similar to the process illustrated above. The user may go through the steps for practice and add these dimensions before proceeding to the next steps. With this we have reached the end of the process of building the cube. A fact table was selected and the dimensions were defined. The wizard has been given the inputs on where to find the values, measures that we want incorporated into the cube. Now the user must save the cube. Click Next in the above screen to proceed. The user is confronted with the message as below:
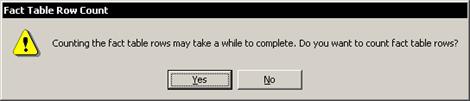
Since we want to count the fact table rows we will click Yes. The next message that will be encountered will be an error message as under:
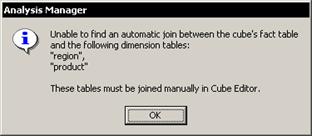
The reason for this error message is apparent. The user has forgotten to ensure that the joins exist between the fact table and the Product and region dimension tables. This is a very common error and must be guarded against. The purpose of generating this error messages was to illustrate the most common mistake users can make while architecting the cube. This can however, be rectified manually by using the Cube Editor if matching keys are available in both tables. In the example below it is clear that there are no matching key values available and hence no direct join is possible. However, a ‘bridge’ table can be used to join the tables.


Let us see how we can do this. Let us first look at the sales_fact_1998 and the Region table. Go to the ‘Insert Table’ Icon on the tool bar as shown in the illustration. This invokes the Select Tables dialog box.


{mospagebreak}
We will select Store table from the dialog box. Then we will connect the region and Store table and Click Add. The table does not close but it adds the store table to the Cube Wizard. The dialog box has to be closed by clicking Close.


Note that the Wizard has added the table to the cube and induces a join between the region table and the store table. The obvious choices are made by default, but the accuracy of the join should be examined. Here the common field is the region_id and the join is made on that

Now the join between the Store table and the Fact table needs to be established via the store_id if the Wizard has not already established it. The link can be established by dragging the store_id field in the store table to the store_id field in the sales_fact_1998 table. If a wrong join has been established by mistake, the same can be removed by clicking on it with the left mouse button to highlight it and then right clicking on it for the remove option.

Now we can exit the cube by selecting Exit in the file menu option. We are prompted to save our cube after our changes. We click Yes. We are then prompted to design storage options in the Design storage dialog. Here we have an option to save and come back later or proceed with the process of designing the storage and processing the cube
[catlist id=181].