Creating and Managing .NET Assemblies
Single-file and multi-file assemblies, Combining modules written in different languages, Creating a multi-file assembly, End Namespace, Static and dynamic assemblies, Private and shared assemblies, Sharing an assembly, Satellite and Resource-only assemblies, Compiling Satellite Assemblies, Compiling Satellite Assemblies With Strong Names, Obtaining the Public Key, Delay Signing an Assembly, Re-signing an Assembly, Installing a Satellite Assembly in the Global Assembly Cache, Resources in Applications, Creating and Localizing Resources and Packaging and Deploying Resources
Single-file and multi-file assemblies
A single-file assembly is the simplest of all the assemblies. It contains type information and implementation along with the manifest. This can be created using command-line compilers or Visual Studio 2005. The default file extension for the assembly is .exe. We shallsee how a single-file assembly is created.
Go to the command prompt for Visual Studio.
Type the
The compiler name depends on the language used in code module and the module name is the module that you want to compile into an assembly.
Visual Basic compiler command to compile MyModule.vb is : vbc MyModule.vb C# compiler command to compile MyModule.cs is: csc MyModule.cs
You can use the option /t:library to create a library assembly.
Multi-file assemblies can be created using command line compilers or Visual Studio 2005 with Managed Extensions for C++. This requires that one file should contain the assembly manifest. The assembly that starts an application must also contain an entry point, such as a Main or WinMain method.
Let us now illustrate this point.. Consider an application that you need to compile which contains two code modules namely Personnel.vb and admin.vb. In this, the module admin.vb creates the InAdmin namespace that is referenced by the code in personnel.vb. The personnel.vb contains the main method, which is the application entry point. In this scenario you will compile the two code modules, and then create a third file that contains the assembly manifest, which is used to launch the application. The assembly manifest references both personnel and admin module. Thus the point to be noted is that the multi-file assembly must contain only one entry point. We shall briefly see some of the reasons why we need to create multi-file assembly:
Combining modules written in different languages:
To manage the availability of the assemblies over the network, only the most used modules are downloaded and the least used module is downloaded only when needed.
To combine the modules developed by multiple programmers:
1. The user has the choice to sign the file that contains the assembly manifest or the choice to give the file a strong name and put it in the global assembly cache.
Creating a multi-file assembly
The first step is to compile all the files that contain namespaces referenced by other modules in the assembly into code modules. The default extension for code module is .netmodule. Next compile all other modules using the necessary compiler options to indicate the other modules that are referenced in the code.
Then, use the assembly linker ( Al.exe) to create the output file that contains the assembly manifest. This file contains reference information for all modules or resources that are part of the assembly. Finally, in a new windows project add the following codes to the Form:
End Namespace
Save and build the application. Now use the command vbc with the option/t:module to compile the code. The command prompt window is shown below. The Form1.netmodule file is also displayed here.
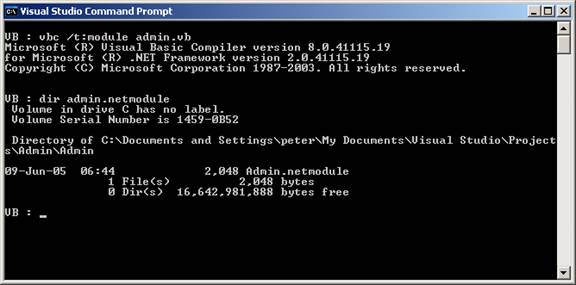
Specifying the module parameter with the /t: compiler option indicates that the file should be compiled as a module rather than as an assembly.
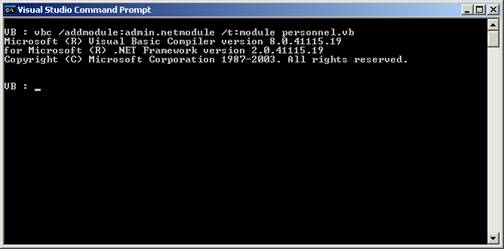
Specify the /t:module option because this module will be added to an assembly in a future step. Specify the /addmodule option because the code in Client references a namespace created by the code in Admin.netmodule. The compiler produces a module called personnel.netmodule that contains a reference to another module, admin.netmodule.
The Visual Basic compilers support directly creating multi-file assemblies using the following two different syntaxes.
Two compilations create a two-file assembly:
vbc /t:module Admin.vb
vbc personnel.vb /addmodule:Admin.netmodule
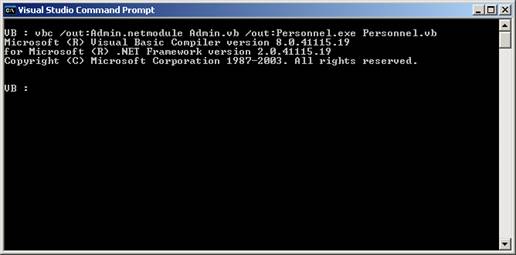
One compilation creates a two-file assembly:
vbc /out:Admin.netmodule Admin.vb /out:Personnel.exe Personnel.vb
The Assembly Linker (Al.exe) can be used to create an assembly from a collection of compiled code modules.
To create a multi-file assembly using the Assembly Linker
1. At the command prompt, type the following command:
al < module name > < module name > … /main:< method name > /out:< file name > /target:< assembly file type >
{mospagebreak}
.
.
.
In this command, the module name arguments specify the name of each module to include in the assembly. The /main: option specifies the method name that is the assembly’s entry point. The /out: option specifies the name of the output file, which contains assembly metadata. The /target: option specifies that the assembly is a console application executable (.exe) file, a Windows executable (.win) file, or a library (.lib) file.
In the following example, Al.exe creates an assembly that is a console application executable called myAssembly.exe. The application consists of two modules called personnel.netmodule and admin.netmodule, and the executable file called myAssembly.exe, which contains only assembly metadata. The entry point of the assembly is the Main method in the class personnel, which is located in personnel.dll.
al personnel.netmodule Admin.netmodule /main:..Main /out:myAssembly.exe /target:exe
Static and dynamic assemblies
Reflection emit provides many ways to create dynamic assemblies. Dynamic assemblies can be created using the various System.AppDomain.DefineDynamicAssembly methods. DefineDynamicAssembly returns an AssemblyBuilder object. DefineDynamicAssembly requires the caller to specify the AssemblyBuilderAccess enumeration value. The enumeration value specifies whether the dynamic assembly will be run only, saved only, or run and/or saved. Some of the methods require the caller to supply evidence, which is the set of information that constitutes input to security policy decisions, such as which permissions can be granted to code. Other methods require the caller to request permissions. Three kinds of permission requests exist: required, optional, and refused.
The following list identifies the various ways in which dynamic assemblies can be defined:
1. Define a named dynamic assembly.
2. Define a named dynamic assembly given the directory for saving the assembly.
3. Define a named dynamic assembly given the evidence.
4. Define a named dynamic assembly given the permission requests.
5. Define a named dynamic assembly given the evidence and the directory for saving the assembly.
6. Define a named dynamic assembly given the permission requests and the directory for saving the assembly.
7. Define a named dynamic assembly given the evidence and the permission requests.
8. Define a named dynamic assembly given the evidence, the permission requests, and the directory for saving the assembly.
9. Define a named dynamic assembly given the evidence, the permission requests, the directory for saving the assembly, and a Boolean parameter indicating whether the creation of modules, types, and members in the dynamic assembly should be synchronized.
A persistent dynamic assembly is saved using the AssemblyBuilder.Save method. The Save method specifies the name of the file to which the assembly should be written.
Private and shared assemblies
Assemblies can be private or shared: by default, most simple C# programs consist of a private assembly because they are not intended to be used by other applications.
In order to share an assembly with other applications, it must be placed in the Global Assembly Cache (GAC).
Sharing an assembly
-
Create your assembly.
-
Assign a strong name to your assembly.
-
Assign version information to your assembly.
-
Add your assembly to the Global Assembly Cache.
-
Access the types contained in the assembly from the other applications.
Satellite and Resource-only assemblies
Satellite assemblies are often used to deploy language-specific resources for an application. These language-specific assemblies work in side-by-side execution because the application has a separate product ID for each language and installs satellite assemblies in a language-specific subdirectory for each language. When uninstalling, the application removes only the satellite assemblies associated with a given language and .NET Framework version. No core .NET Framework files are removed unless the last language for that .NET Framework version is being removed.
For example, English and French editions of the .NET Framework version 2.0 share the same core files. The French .NET Framework version 2.0 adds satellite assemblies with localized resources in a fr subdirectory. An application that supports the .NET Framework version 2.0, regardless of its language, always uses the same core runtime files.
The CurrentUICulture property can be set on a per-application or per-thread basis. The application returns resources that have been localized according to the CurrentUICulture property, assuming localized files for that language have been installed. For example, an application can return English resources while running on the French Windows operating system with a French version of the .NET Framework version 2.0 installed.
The hub and spoke model described in the Packaging and Deploying Resources topic is the recommended design implementation for developing applications with resources.
The hub and spoke model requires that you place resources in specific locations, so that they can be easily located and use. The common language runtime will not be able to locate them if the resources are not properly named or located. As a result, the runtime uses the default resource set.
Compiling Satellite Assemblies
Use the Assembly Linker (Al.exe) to compile .resources files into satellite assemblies. Al.exe creates an assembly from the .resources files that you specify. By definition, satellite assemblies can only contain resources. They cannot contain any executable code.
The following Al.exe command creates a satellite assembly for the application MyApp from the file strings.de.resources.
al /t:lib /embed:strings.de.resources /culture:de /out:MyApp.resources.dll
The following Al.exe command also creates a satellite assembly for the application MyApp from the file strings.de.resources. The /template option causes the satellite assembly to inherit assembly metadata from the parent assembly MyApp.dll.
al /t:lib /embed:strings.de.resources /culture:de /out:MyApp.resources.dll
/template:MyApp.dll
The following table explains the Al.exe options used in these examples in more detail.
|
Option |
Description |
|
/t:lib |
The /t option specifies that your satellite assembly is compiled to a library (.dll ) file |
|
/embed:strings.de.resources |
The /embed option specifies the name of the source file to use when Al.exe compiles the assembly. |
|
/culture:de |
The /culture option specifies the culture of the resource to compile. |
|
/out:MyApp.resources.dll |
The /out option specifies the name of the output file. |
|
/template:filename |
The /template option specifies an assembly from which to inherit all assembly metadata, except the culture field. |
{mospagebreak}
.
.
.
Compiling Satellite Assemblies With Strong Names
To install satellite assemblies into the global cache they must have strong names. Strong-named assemblies are signed with a valid public/private key pair.
When an application is being developed it is likely that the developer does not have access to the final public/private key pair. In order to install a satellite assembly in the global assembly cache and ensure that it works as expected, the technique called delayed signing is used. Delay sign an assembly implies that a space in the file is reserved for the strong name signature at build time. The actual signing is delayed until a later date when the final public/private key pair is available.
Obtaining the Public Key
To delay sign an assembly, the developer must have access to the public key. Public keys can be obtained from the organization that will do the eventual signing or a public key can be created using the Strong Name Tool(Sn.exe)
The following Sn.exe command creates a test public/private key pair and saves it in the file TestKeyPair.snk. The –k option specifies to Sn.exe to create a new key pair and save it in the specified file.
sn –k TestKeyPair.snk
The public key can be extracted from the file containing the test key pair. The following command extracts the public key from TestKeyPair.snk and saves it in PublicKey.snk.
sn –p TestKeyPair.snk PublicKey.snk
Delay Signing an Assembly
Once the developer has obtained or created the public key, the Assembly Linker (Al.exe) can be used to compile the assembly and specify delayed signing.
The following Al.exe command creates a strong-named satellite assembly for the application MyApp from the strings.ja.resources file.
al /t:lib /embed:strings.ja.resources /culture:ja /out:MyApp.resources.dll /delay+ /keyfile:PublicKey.snk
The /delay+ option specifies to delay sign the assembly. The /keyfile: option specifies the name of the key file containing the public key to use to delay sign the assembly.
Re-signing an Assembly
At some later date, a delay-signed satellite assembly must be re-signed with the real key pair. This can be done using Sn.exe.
The following Sn.exe command signs MyApp.resources.dll with the real key pair stored in the file RealKeyPair.snk. The –R option specifies to Sn.exe to re-sign a previously signed or delay-signed assembly.
sn –R MyApp.resources.dll RealKeyPair.snk
Installing a Satellite Assembly in the Global Assembly Cache
A satellite assembly that has been compiled with a strong name is ready to install in the global assembly cache. The assemblies can be installed into the cache using the Global Assembly Cache Tool (Gacutil.exe).
The following Gacutil.exe command installs MyApp.resources.dll into the global assembly cache.
gacutil /i:MyApp.resources.dll
The /i option specifies to Gacutil.exe to install the specified assembly into the global assembly cache. As a result of this command, an entry is placed in the cache, which allows entries in this .resources file to be accessed. After being installed in the cache, the specified resource is available to all applications that are designed to use it.
All compiled satellite assemblies have the same name. They are differentiated at runtime based upon the culture specified at compile time in Al exe’s /Culture option and the directory location of the assembly. The satellite assemblies can be placed in expected directory locations..
Resources in Applications
Nearly every production-quality application needs to use resources. A resource is any non-executable data that is logically deployed with an application. A resource might be displayed in an application as error messages or as part of the user interface. Resources can contain data in a number of forms, including strings, images, and persisted objects. Storing your data in a resource file allows you to change the data without recompiling your entire application. Note that to write persisted objects to a resource file, the objects must be serializable.
The .NET Framework provides comprehensive support for the creation and localization of resources. In addition, the .NET Framework supports a simple model for packaging and deploying these localized resources.
Creating and Localizing Resources
The application’s resources can be localized for specific cultures. This allows the developer build localized (translated) versions of the application. An application loads the appropriate localized resources based on the value of the CultureInfo.CurrentUICulture property. This value is set either explicitly in the application’s code or by the common language runtime based on the locale for the current user on the local computer.
Packaging and Deploying Resources
The application’s resources can be deployed in satellite assemblies. By definition, satellite assemblies only contain resource files. They do not contain any application code. In the satellite assembly deployment model, the developer can create an application with one default assembly (which is the main assembly) and several satellite assemblies. A satellite assembly should be created for each culture that the application supports. Because the satellite assemblies are not part of the main assembly, the developer can easily replace or update resources corresponding to a specific culture without replacing the application’s main assembly.
It is important to determine which resources will make up the application’s default resource assembly as it is a part of the main assembly. Any changes to it will compel the replacement of the main assembly. If a default resource is not provided for, an exception will be thrown when the resource fallback process attempts to find it. In a well-designed application, using resources should never throw an exception.
In this lesson we have studied in great detail the process of creating and using components and assemblies in VB.NET. In the lessons that follow we shall focus upon Data Binding.
[catlist id=175].