VB.NET 2005 Tutorials : Shared Assembly
In this tutorial you will learn about Shared Assembly, how to Assign Strong name to an assembly, Microsoft Windows Installer 2.0, Using the Global Assembly Cache tool (Gacutil.exe), Removing an Assembly from the Global Assembly Cache, Referencing an Assembly from Global Assembly Cache, Creating a Setup project for distributing components and Creating a new merge module project.
Shared Assembly
Shared Assembly can be shared amongst several different applications that reside on the same server. This type of assembly can be used in situations where it is not necessary to install a version of an assembly for each application that uses it. For instance, it is not necessary to install the System.Windows.Forms.dll assembly for each application that uses it. It is far better to install a shared version of the assembly.
There are certain requirements that are placed upon shared assemblies. The assembly needs to have a globally unique name, which is not a requirement of application-private assemblies. Strong names are used to create a globally unique name for an assembly. As that assembly is shared, all references to the shared assembly are checked to ensure the correct version is being used by an application. Shared assemblies are stored in the Global Assembly Cache(GAC), which is usually located in the assembly folder in the windows directory( for example in Windows XP, C:Windowsassembly).
Assigning Strong name to an assembly
Strong name is not a name as such but is, in fact, a public key that has been generated by the author of the assembly in order to uniquely identify the assembly. A strong name is what is used to ensure that your assembly has a unique signature compared to other assemblies that may have the same name. Strong names were introduced to combat the situation where a developer would have created a component and another developer releases a different assembly with the exactly the same name as the original component, and could be mistaken for being new version of the original component. Without strong names users would be confused and unable to identify the problem.
A strong name is based on public-private key encryption and creates a unique identity for the assembly. A key pair can be created and can be used to define a strong name by using the SN tool included in the .NET Framework SDK. The public key is stored in the identity section of the manifest. A signature of the file containing the assembly’s manifest is created and stored in the resulting PE file. The .NET Framework uses these two signature when resolving type references to ensure that the correct assembly is loaded at runtime. A strong name is indicated in the manifest by the .publickey directive in the .assembly section.
To create a key pair
1) At the command prompt, type the following command:
sn -k
2) In this command, file name is the name of the output file containing the key pair.
3) The following example creates a key pair called sgKey.snk.
sn -k sgKey.snk
4) If you intend to delay sign an assembly and you control the whole key pair (which is unlikely outside test scenarios), you can use the following commands to generate a key pair and then extract the public key from it into a separate file. First, create the key pair:
sn -k keypair.snk
5) Next, extract the public key from the key pair and copy it to a separate file:
sn -p keypair.snk public.snk
Once the key pair is created, the developer must put the file where the strong name signing tools can find it. When signing an assembly with a strong name, the Assembly Linker (Al.exe) looks for the key file relative to the current directory and to the output directory. When using command-line compilers,the key can be copied to the current directory containing the code modules.
If an IDE, such as Visual Studio .NET is being used, to sign an assembly with a strong name, it is important to understand where the IDE looks for the key file. For example, Visual Basic .NET looks for the key file in the directory containing the Visual Studio Solution, whereas the C# compiler looks for the key file in the directory containing the binary. Put the key file in the appropriate project directory and set the file attribute as follows:
< Assembly: AssemblyKeyFileAttribute("key.snk") >
Assigning Strong Name to an Assembly
There are two ways to sign an assembly with a strong name:
- Using the Assembly Linker (Al.exe) provided by the .NET Framework SDK.
- Using assembly attributes to insert the strong name information in your code. The AssemblyKeyFileAttribute or the AssemblyKeyNameAttribute can be used, depending on where the key file to be used is located.
The developer must have a cryptographic key pair to sign an assembly with a strong name.
To create and sign an assembly with a strong name using the Assembly Linker
- At the command prompt, type the following command:
al /out:<assembly name=””></assembly> <module name=””></module>/keyfile:<file name=””></file> - In this command, assembly name is the name of the assembly to sign with a strong name, module name is the name of the code module used to create the assembly, and file name is the name of the container or file that contains the key pair.
- The following example signs the assembly MyAssembly.dll with a strong name using the key file sgKey.snk.
al /out:MyAssembly.dll MyModule.netmodule /keyfile:sgKey.snk
To sign an assembly with a strong name using attributes
- In a code module, add the AssemblyKeyFileAttribute or the AssemblyKeyNameAttribute, specifying the name of the file or container that contains the key pair to use when signing the assembly with a strong name.
- The following code example uses the AssemblyKeyFileAttribute with a key file called sgKey.snk.
< Assembly:AssemblyKeyFileAttribute("sgKey.snk") > - You can also delay sign an assembly when compiling.
- When signing an assembly with a strong name, the Assembly Linker (Al.exe) looks for the key file relative to the current directory and to the output directory. When using command-line compilers,copy the key to the current directory containing the code modules.
Adding an Assembly into the Global Assembly Cache
There are two ways to install an assembly into the global assembly cache:
Microsoft Windows Installer 2.0
This is the recommended and most common way to add assemblies to the global assembly cache. The installer provides reference counting of assemblies in the global assembly cache, plus other benefits.
Using the Global Assembly Cache tool (Gacutil.exe)
You can use Gacutil.exe to add strong-named assemblies to Adding predefined installation components to your project.the global assembly cache and to view the contents of the global assembly cache.
Note Gacutil.exe is only for development purposes and should not be used to install production assemblies into the global assembly cache.
To install a strong-named assembly into the global assembly cache
- At the command prompt, type the following command:
gacutil -I <assembly name=””></assembly> - In this command, assembly name is the name of the assembly to install in the global assembly cache.
- The following example installs an assembly with the file name hello.dll into the global assembly cache.
gacutil -i hello.dll - The .NET Framework SDK also provides a Windows shell extension called the Assembly Cache Viewer (Shfusion.dll), which you can use to drag assemblies into the global assembly cache.
Removing an Assembly from the Global Assembly Cache
- Use the Global Assembly Cache tool (Gacutil.exe) to remove an assembly from the global assembly cache.
- To remove an assembly from the global assembly cache
- At the command prompt, type the following command:
gacutil -u <assembly name=””></assembly> - In this command, assembly name is the name of the assembly to remove from the global assembly cache.
- The following example removes an assembly named hello.dll from the global assembly cache.
gacutil -u hello
The .NET Framework SDK also provides a Windows shell extension called the Assembly Cache Viewer (Shfusion.dll), which can be used to remove assemblies from the global assembly cache.
{mospagebreak}.
Referencing an Assembly from Global Assembly Cache
To use an assembly, add a reference to it, as described in Adding and Removing References. Next, use the Imports statement to choose the namespace of the items to be use, as described in References and the Imports Statement Once an assembly is referenced and imported, all the accessible classes, properties, methods, and other members of its namespaces are available to the application as if their code were part of your source file. A single assembly can contain multiple namespaces, and each namespace can contain a different grouping of items, including other namespaces.
Adding and Removing References
In order to use a component in the application, first add a reference to it. Visual Studio .NET provides three options on the Add Reference dialog box:
- .NET – Lists all .NET Framework components available for referencing.
- COM – Lists all COM components available for referencing.
- Projects – Lists all reusable components created in local projects.
Web references can also be added in the Add Web Reference dialog box.
Note Avoid adding file references to outputs of another project in the same solution, because doing so may cause compilation errors. Instead, use the Projects tab of the Add References dialog box to create project-to-project references. This makes team development easier, by allowing for better management of the class libraries you create in your projects.
To add a reference
- In Solution Explorer, expand the project node to which a reference is to be added.
- Right-click the References node for the project and select Add Reference from the shortcut menu.
- To add a reference to a component or components, do the following:
- In the Add Reference dialog box, select the tab indicating the type of component to be referenced.
- In the top pane, select the component to be referenced, and then click the Select button.
Tip If the component you are looking for is not in the list, you may locate it using the Browse button.
The component referenced appears in the SelectedComponents pane of the dialog box.
- Repeat Step b for each additional component added.
- Click OK when references are all added.
Selected references will appear under the References node of the project.
To remove a reference
- In Solution Explorer, right-click the reference in the References node, and select Remove from the shortcut menu.
- By default, the Add References dialog box only lists assemblies that are in the Public Assemblies folder (Program FilesMicrosoft Visual Studio .NETCommon7IDEPublic Assemblies) or in the Global Assembly cache. You can add your own assemblies to the list by adding a registry key to specify their location.
To add assemblies to the Add References dialog box
- In Windows, click the Start button, click Run, then type regedit, to open the Registry Editor.
- Select the registry key HKEY_LOCAL_MACHINESOFTWAREMicrosoftVisualStudio7.0AssemblyFolders
- On the Edit menu, point to New, then, click Key.
- Enter a name for the key (for example, MyAssemblies).
- Select the (Default) value for the key that you just added.
- On the Edit menu, choose Modify.
- In the Edit String dialog box, select the Value data field and enter the full path to the folder where your assemblies are located.
Note Only the specified folder will be searched each time the Add References dialog box is opened; subfolders will not be searched. Separate keys must be added for each subdirectory to be searched.
External objects can be made available to the project by choosing the Add Reference command from the Project menu. References in Visual Basic .NET can point to assemblies, which are like type libraries but contain more information. Assemblies include one or more namespaces. When a reference is added to an assembly, an Imports statement can also be added to a module that controls the visibility of that assembly’s namespaces within the module. The Imports statement provides a scoping context that lets only the portion of the namespace necessary to be used to supply a unique reference.
The Imports statement has the following syntax
Imports [| aliasname =] Namespace
Aliasname refers to a short name you can use within code to refer to an imported namespace. Namespace is a namespace available through either a project reference, through a definition within the project, or through a previous Imports statement.
A module may contain any number of Imports statements. They must appear after any Option statements, if present, but before any other code.
Note Do not confuse project references with the Imports statement or the Declare statement. Project references make external objects, such as objects in assemblies, available to Visual Basic .NET projects. The Imports statement is used to simplify access to project references, but does not provide access to these objects. The Declare statement is used to declare a reference to an external procedure in a dynamic-link library (DLL).
How the Runtime Locates Assemblies
To successfully deploy the .NET Framework application, the developer must understand how the common language runtime locates and binds to the assemblies that make up the application. By default, the runtime attempts to bind with the exact version of an assembly that the application was built with. This default behavior can be overridden by configuration file settings.
The common language runtime performs a number of steps when attempting to locate an assembly and resolve an assembly reference. Each step is explained in the following sections. The term probing is often used when describing how the runtime locates assemblies; it refers to the set of heuristics used to locate the assembly based on its name and culture.
Note Binding information can be viewed in the log file using the Assembly Binding Log Viewer (Fuslogvw.exe), which is included in the .NET Framework SDK.
Initiating the Bind
The process of locating and binding to an assembly begins when the runtime attempts to resolve a reference to another assembly. This reference can be either static or dynamic. The compiler records static references in the assembly manifest’s metadata at build time. Dynamic references are constructed on the fly as a result of calling various methods, such as System.Reflection.Assembly.Load. The preferred way to reference an assembly is to use a full reference, including the assembly name, version, culture, and public key token (if one exists). The runtime uses this information to locate the assembly. The runtime uses the same resolution process regardless of whether the reference is for a static or dynamic assembly.
Dynamic reference can reference an assembly by providing the calling method with only partial information about the assembly, such as specifying only the assembly name. In this case, only the application directory is searched for the assembly, and no other checking occurs. A partial reference using any of the various methods for loading assemblies such as System.Reflection.Assembly.Load or AppDomain.Load can be made. If the global assembly cache and the application directory is to be checked for a referenced assembly, you can specify a partial reference using the System.Reflection.Assembly.LoadWithPartialName method. Finally, a dynamic reference can be made using a method such as System.Reflection.Assembly.Load and provide only partial information. This can then be used to qualify the reference using the
Note: This type of partial reference should not be used with assemblies that are shared among several applications. Because configuration settings are applied per application and not per assembly, a shared assembly using this type of partial reference would require each application using the shared assembly to have the qualifying information in its configuration file.
The runtime uses the following steps to resolve an assembly reference:
1. Determines the correct assembly version by examining applicable configuration files, including the application configuration file, publisher policy file, and machine configuration file. If the configuration file is located on a remote machine, the runtime must locate and download the application configuration file first.
2. Checks whether the assembly name has been bound to before and, if that is so, it uses the previously loaded assembly.
3. Checks the global assembly cache If the assembly is found there, the runtime uses this assembly.
4. Probes for the assembly using the following steps:
- If configuration and publisher policy do not affect the original reference and if the bind request was created using the Assembly.LoadFrom method, the runtime checks for location hints.
- If a codebase is found in the configuration files, the runtime checks only this location. If this probe fails, the runtime determines that the binding request failed and no other probing occurs.
- Probes for the assembly using the heuristics described in the probing section If the assembly is not found after probing, the runtime requests the Windows Installer to provide the assembly. This acts as an install-on-demand feature.
Note There is no version checking for assemblies without strong names, nor does the runtime check in the global assembly cache for assemblies without strong names.
{mospagebreak}
Delay Signing an Assembly
An organization can have a closely guarded key pair that developers do not have access to on a daily basis. The public key is often available, but access to the private key is restricted to only a few individuals. When developing assemblies with strong names, each assembly that references the strong-named target assembly contains the token of the public key used to give the target assembly a strong name. This requires that the public key be available during the development process.
A delayed or partial signing can be used at build time to reserve space in the portable executable (PE) file for the strong name signature, but defer the actual signing until some later stage (typically just before shipping the assembly).
The following steps outline the process to delay sign an assembly:
1. Obtain the public key portion of the key pair from the organization that will do the eventual signing. Typically this key is in the form of an .snk file, which can be created using the Strong Name tool (Sn.exe) provided by the .NET Framework SDK.
2. Annotate the source code for the assembly with two custom attributes from System.Reflection:
i. AssemblyKeyFileAttribute, which passes the name of the file containing the public key as a parameter to its constructor.
ii. AssemblyDelaySignAttribute, which indicates that delay signing is being used by passing true as a parameter to its constructor. For example:
<assemblykeyfileattribute mykey.snk=””></assemblykeyfileattribute>
<assemblydelaysignattribute></assemblydelaysignattribute>
3. The compiler inserts the public key into the assembly manifest and reserves space in the PE file for the full strong name signature. The real public key must be stored while the assembly is built so that other assemblies that reference this assembly can obtain the key to store in their own assembly reference.
4. Because the assembly does not have a valid strong name signature, the verification of that signature must be turned off. This can be done by using the –Vr option with the Strong Name tool.
The following example turns off verification for an assembly called myAssembly.dll.
sn –Vr myAssembly.dll
CAUTION Use the -Vr option only during development. Adding an assembly to the skip verification list creates a security vulnerability. A malicious assembly could use the fully specified assembly name (assembly name, version, culture, and public key token) of the assembly added to the skip verification list to fake its identity. This would allow the malicious assembly to also skip verification.
5. Later, usually just before shipping, you submit the assembly to your organization’s signing authority for the actual strong name signing using the –R option with the Strong Name tool.
The following example signs an assembly called myAssembly.dll with a strong name using the sgKey.snk key pair.
sn -R myAssembly.dll sgKey.snk
Creating a Setup project for distributing components
Using the Deployment tools in Visual Studio .NET developers can create Windows Installer (.msi) files that can be distributed and installed on other computers. As the requirements and specifications of various projects are different the deployment method is also varied. The components that we design are usually shared between several projects and in this case we use Merge Module Project to create a setup project for distributing components. This method creates a merge module file with an extension .msm. This file includes all files, resources, registry entries, and setup logic for the component. This .msm file that we create can be merged into other deployment projects. This method allows us to have a consistent installation of the components across multiple applications.
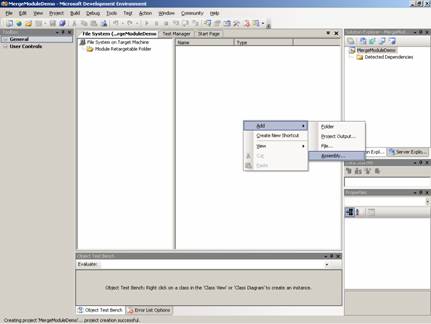
Creating a new merge module project
On the file menu, Choose Add Project and click on New Project
- In the dialog box Add new Project dialog box and select setup and deployment projects.
- Choose Merge Module Project
- A new Merge Module project is created.

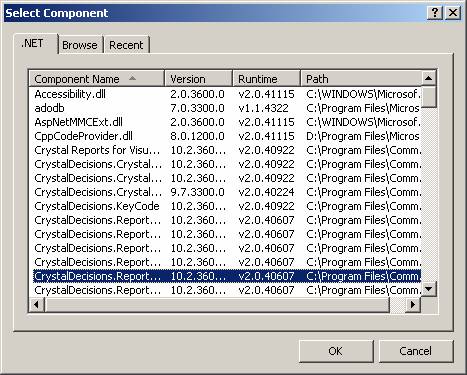
The assembly of the component can be added to the module and the module can be built.
In this window developers can choose the assembly of the component that has to be distributed.
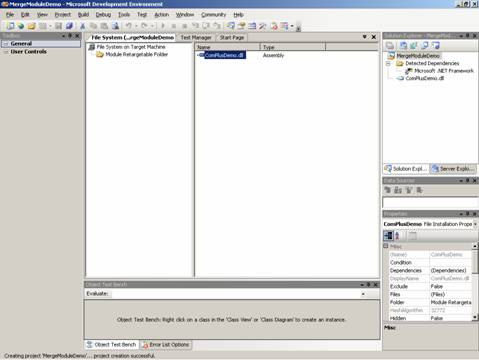
The above graphic shows the successful creation of the project.
To Add an Existing merge module project to a solution:
1. On the File menu choose Add Project and then Click on exiting project
2. A dialog box Add Existing Project opens. Browse to the location of the merge module project and click open.
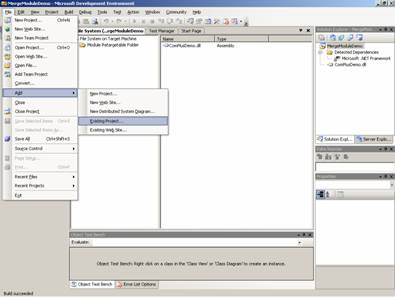
The above graphic shows the menu for adding existing project.
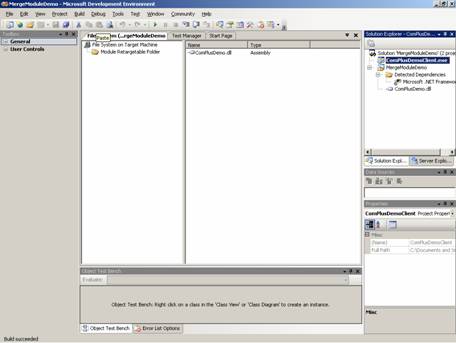
The above graphic shows the merge module successfully built including the newly added module.
[catlist id=175].