In this tutorial you will learn about Using the Data Form Wizard – Building a Single-Table Data Form, Transform and Filter Data, Using Server Explorer, Drag-and-Drop From Server Explorer, What the user Can and Cannot Drag from Server Explorer, Filtering Data, Filtering With DataViews, Filtering At the Server, Transforming Data with Lookups and Master Detail.
Using the Data Form Wizard
Building a Single-Table Data Form
Adding a single table to a form using a wizard makes for ease of application development. The following example demonstrates the building of a form to display single table using a DataGrid.
Building a Multiple-Table Data Form
In most applications the user needs to create forms that display data in format that shows the master detail relationship. For an example if we have a ComboBox Control bound to a column in a Lookup table and the user needs to show data in a DataGrid which is filtered by the selected column in the ComboBox Control, then this kind of form is said to be a Master Detail form. Now we shall go through another example that illustrates this.
Transform and Filter Data
Using Server Explorer
Server Explorer or Database Explorer is displayed in a window usually docked to the top left hand side of the window. If it is not visible it can be invoked by pressing the keys Ctrl + Alt + S simultaneously. This window shows all the data connections existing in the project. It also displays an icon for creating a new connection. The process of using the Wizard for creating a new connection has already been discussed earlier in this lesson.
Adding a Data Connection
By default, Server Explorer/Database Explorer displays data connections and links to servers that the user has previously used.
Server Explorer displays database connections beneath the Data Connections node. After a connection is established, the user can design programs to open connections and retrieve and manipulate the data provided.
To add a data connection in Server Explorer
1. On the Tools menu, select Connect to Database.
The Data Link Properties dialog box opens. On the Provider tab of the Data Link Properties dialog box, choose an OLE DB provider.
2. On the Connection tab of the Data Link Properties dialog box, provide the information requested. The input fields displayed vary, depending upon the provider selected on the Provider tab.
For example, if the user must select the OLE DB Provider for Oracle, the Connection tab displays fields for server name and login. If the user select the OLE DB Provider for SQL Server, the Connection tab displays fields for server name, type of authentication, and database.
3. Click OK to establish the data connection.
The Data Link Properties dialog box closes, and the new data connection appears beneath the Data Connections node, named for the server and database accessed.
For example, if the user must create a data connection to a database called Nwind on a server named Server1, a new connection named Server1.Nwind.dbo appears beneath the Data Connections node.
Drag-and-Drop From Server Explorer
Server Explorer/Database Explorer is the server management console for Visual Studio .NET. The user can deploy the Server Explorer/Database Explorer to open data connections and to log on to servers and explore their databases and system services. The user can drag nodes from Server Explorer/Database Explorer and drop them onto the Dataset Designer. This creates new data components that are preconfigured to reference the item dropped. When the users drag certain resources from Server Explorer and drop them onto Visual Studio designers, the integrated development environment (IDE) automatically creates new components that reference the resources selected. For example, if the user drags a message queue from Server Explorer onto a Windows project, the IDE automatically creates a System.Messaging.MessageQueue component preconfigured to reference that particular queue. The user can then write code that accesses and manipulates data from that queue via this new component.
To create a new component using Server Explorer
1. Open the project, form, or class to which the user want to add a component in a designer.
2. In Server Explorer, select the item the user want to use.
3. Drag the item from Server Explorer to the designer surface, or right-click the item and click Add to Designer.
.
.
What the user Can and Cannot Drag from Server Explorer
The following table lists items that the user can drag from Server Explorer, and describes the components created when the user drop them onto a Visual Studio project, form, or class designer.
|
Node type |
Draggable items |
Result |
|
Servers |
Event log categories, message queues, performance counters, and services |
|
|
Event Logs |
Event log categories |
An System.Diagnostics.EventLog component appears, pointing to the category selected. For more information, see Logging Application, Server, and Security Events. |
|
Message Queues |
Individual message queues |
A System.Messaging.MessageQueue component appears, pointing to the queue selected. For more information, see Using Messaging Components. |
|
Performance Counters |
Individual counters and instances |
A System.Diagnostics.PerformanceCounter component appears, pointing to the counter (and instance) selected. For more information, see Introduction to Monitoring Performance Thresholds. |
|
Services |
Individual services |
A System.ServiceProcess.ServiceController component appears, preconfigured to interact with the service selected. For more information, see Introduction to Communicating with Existing Services. |
The user cannot drag any data items from Server Explorer. The user also can create blank components by dragging items from the Toolbox.
{mospagebreak}
.
.
Filtering Data
Filtering and sorting data is one of the most needed activity in the constructing any solution. We have so far seen data being pulled out from the table and displayed using some controls. However we have added an additional facility to navigate through the data. The usefulness of these techniques are limited if we cannot display data which are filtered and sorted. The data filtering can be done at the Server or at the application level with the dataset. Both the methods are discussed below:
.
.
Filtering With DataViews
The moment we use the DataAdapter’s fill method to populate the DataSet, we are dealing with disconnected architecture and the DataSet can be used to create DataViews. All further activities can be performed at the DataView level. This does not affect the data at the backend. This is the least network intensive and gives quicker response. The following illustration explores the process of filtering with DataViews
.Filtering At the Server
In some cases the user may still want to filter the data from the server and deal with the active data at all time. In such a scenario the application will be highly network hungry. But this method is useful if the user need dynamic data. Let us illustrate server side filtering :
Transforming Data with Lookups
Sometimes it is useful to display data in a user-friendly format on a Windows Form but store the data in a format that is more meaningful to the user’s program. For example, an order form for food might display the menu items by name in a list box. But the data table recording the order would contain the unique ID numbers representing the food. The user might have two tables like this:
|
OrderID |
ItemID |
Quantity |
|
4085 |
12 |
1 |
|
4086 |
13 |
3 |
|
ID |
Name |
|
12 |
Potato |
|
13 |
Chicken |
|
Property |
Setting |
|
DataSource |
The table that contains information about which ID number is equivalent to which item. In the above scenario, this is ItemTable. |
|
DisplayMember |
The column of the data source table that the user wishes to display in the control. In the above scenario, this is "Name" (to set in code, use quotation marks). |
|
The column of the data source table that contains the stored information. In the above scenario, this is "ID" (to set in code, use quotation marks). |
.
.
5. In a procedure, call the System.Windows.Forms.ControlBindingsCollection.Add method of the ControlBindingsCollection class to bind the control’s System.Windows.Forms.ListControl.SelectedValue property to the table recording the form input. The user can also do this in the designer instead of in code, by accessing the control’s System.Windows.Forms.Control.DataBindings property in the Properties window. In the above scenario, this is OrderDetailsTable, and the column is "ItemID".
.
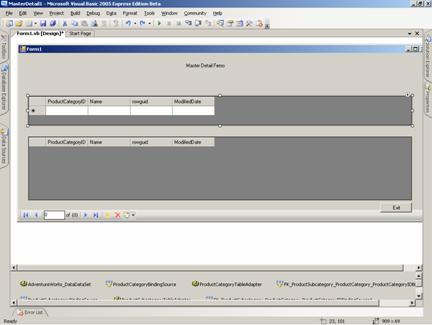
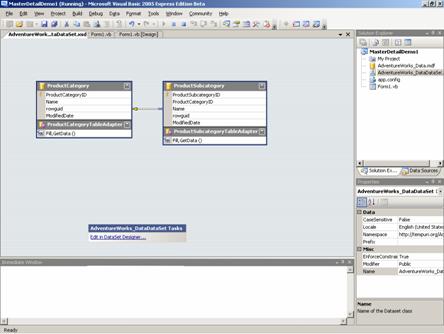
Master Detail
.
Creating the Master detail form is also simple using a wizard. In this case the user creates a new project and adds a database connection and also a DatasSource. After this he selects two tables that have foreign key relationships. Then he creates data sets also by binding the parent file to Grid. He then finished by adding a BindingNavigator and seting it’s dataSource property to emergency.
.
..
...
.
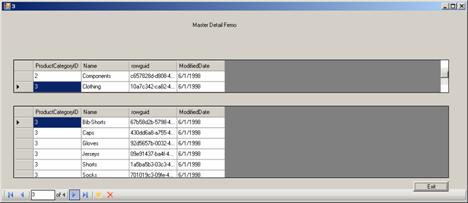
The following screenshot shows the output of a master detail Form we just created.
.
.
In this lesson we have learnt all about Data binding and filtering of data. In the lesson that follows we shall be focusing upon Consuming and Manipulating Data that we have bound to the controls.
4. Set the following properties. They can be set in code or in the designer.
3. Establish a data relation between the two tables. For more information, see Introduction to DataRelation Objects.
2. Connect to the user’s data source.
1. Add a System.Windows.Forms.ComboBox, System.Windows.Forms.ListBox, or System.Windows.Forms.CheckedListBox control to the form.
To create a lookup table
In this scenario, one table, OrderDetailsTable, stores the actual information we are concerned with displaying and saving. But to save space, it does so in a fairly cryptic fashion. The other table, ItemTable, contains only appearance-related information about which ID number is equivalent to which food name, and nothing about the actual food orders.
[catlist id=175].