Exforsys

ASP.NET 2.0

  1. Getting started with ASP.NET 2.0
  2. .NET Framework Fundamentals
  3. Microsoft.NET Framework Tools
  4. Application Development in .NET
  5. What's New in the .NET Framework 2.0 ?
  6. Introduction to Visual Studio.NET
  7. Installing Visual Studio.NET 2005
  8. Working with Visual Studio.NET Web Applications
  9. Whats New in ASP.NET 2.0
  10. Creating an ASP.NET Application
  11. ASP.NET Code Directory
  12. ASP.NET Page Object Model
  13. ASP.NET Server Controls
  14. ASP.NET Working With Master Pages
  15. ASP.NET Creating Content for Master Page
  16. ASP.NET Referencing Master Page Members
  17. ASP.NET Changing Master Pages Dynamically
  18. ASP.NET Creating Nested Master Pages
  19. ASP.NET Working with Web Parts
  20. ASP.NET Using Web Parts and Controls in Web Pages
  21. ASP.NET Web Pages and Layout
  22. ASP.NET - Adding Web Parts at Run Time
  23. ASP.NET Personalization: User Profiles and Themes
  24. ASP.NET Data Access features
  25. ASP.NET State Management
  26. ASP.NET Customizing the Session State Mechanism
  27. ASP.NET State Management And Caching
  28. ASP.NET Security
  29. Forms Authentication in ASP.NET
  30. ASP.NET Managing Membership and Roles
  31. ASP.NET Configuring Page-Level Caching
  32. ASP.NET Setting Application-Level Caching
  33. ASP.NET Data Source Object Model
  34. ASP.NET SqlDataSource Control
  35. ASP.NET Data Bound Controls
  36. ASP.NET GridView Control
  37. ASP.NET GridView Filtering
  38. ASP.NET Adding Sorting and Paging in GridView
  39. ASP.NET DataBound Controls - Details View
  40. ASP.NET Using a Grid to Display Detail Information
  41. ASP.NET Displaying Master-Detail Data on the Same Page
  42. Displaying Master-Detail Data on Separate Pages in ASP.NET
  43. ASP.NET Creating Web Wizards
  44. ASP.NET : Dynamic Image control
  45. ASP.NET Advanced Site Functionality

Ads


Home arrow Technical Training arrow ASP.NET 2.0

ASP.NET Using a Grid to Display Detail Information

Author : Exforsys Inc.     Published on: 13th Sep 2005    |   Last Updated on: 10th Feb 2008

ASP.NET Using a Grid to Display Detail Information

In this tutorial you will learn how to use a GridView Control to display the details of the item selected in the DropDown list and test the page.

Ads

We shall now use a GridView to display the details of the item selected in the DropDown list.

1. Switch to or open the Default.aspx page (or the page you have been working with), and switch to Design view.

2. From the Data group of the Toolbox, drag a GridView control onto the page.

3. In the smart tag panel, from the Connect to Data Source list, select < New Data Source >.

4. In the smart tag panel, select Choose Data Source.

5. The Choose Data Source wizard starts.

6. From the Select a data source list, select < New Data Source >.

7. You will create a second data source that will get different data than the first data source control does.

8. The Data Source Configuration dialog box is displayed:

9. Select Database.

10. In the Specify an ID for the data source box, a default data source control name is displayed (SqlDataSource2). You can leave this name.

11. Click OK.

12. The wizard displays a page where you can select a connection.

13. From the Choose a data connection list, select the connection created and stored earlier.

14. Click Next.

15. The wizard displays a page where you can create a SQL statement.

16. From the Name list under Table or View Options, select StudentMaster.

17. In the Columns box, check StudentId, StudentName, and CourseId.

18. Click WHERE.

19. The Add WHERE Clause dialog box is displayed:

20. From the Column list, select CourseId.

21. From the Operator list, select =.

22. From the Source list, select Control.

23. Under Parameter Properties, in the Control ID list, select DropDownList1.

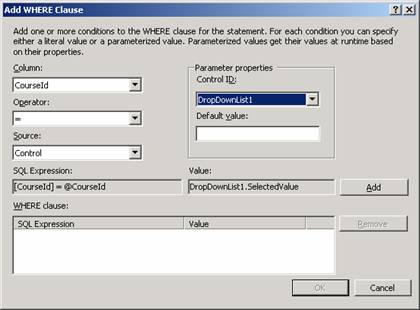
24. The last two steps specify that the query will get the search value for the category ID from the DropDownList control you added earlier.

25. Click Add.

26. Click OK to close the Add WHERE Clause dialog box.

27. Click Next.

28. In the Preview page, click Test Query.

29. The wizard displays a dialog box that prompts you for a value to use in the WHERE clause.

30. Type 22 in the box and click OK.

Ads

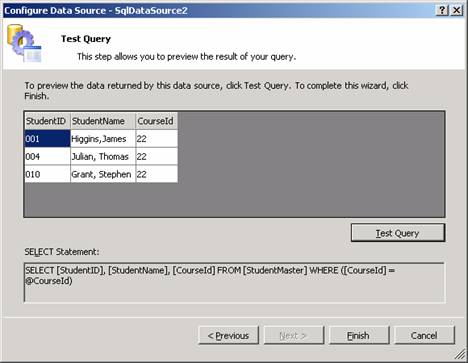
31. The records for CourseId 22 are displayed.

32. Click Finish to close the wizard.

33. The master-detail display can now be tested.

To test the page

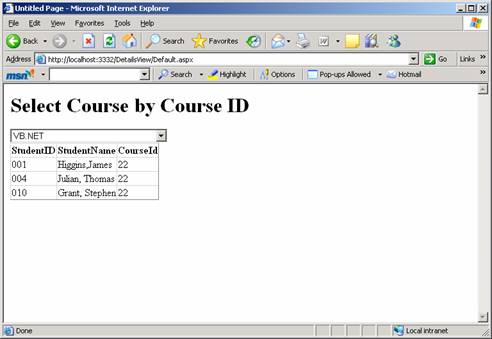
1. Press CTRL+F5 to run the page.

2. When the page appears, Courses from the first item in the drop-down list are displayed.

3. Select a CourseId from the list and confirm that the corresponding Student records appear in the grid.


This tutorial is part of a ASP.NET 2.0 tutorial series. Read it from the beginning and learn yourself.

ASP.NET 2.0

  1. Getting started with ASP.NET 2.0
  2. .NET Framework Fundamentals
  3. Microsoft.NET Framework Tools
  4. Application Development in .NET
  5. What's New in the .NET Framework 2.0 ?
  6. Introduction to Visual Studio.NET
  7. Installing Visual Studio.NET 2005
  8. Working with Visual Studio.NET Web Applications
  9. Whats New in ASP.NET 2.0
  10. Creating an ASP.NET Application
  11. ASP.NET Code Directory
  12. ASP.NET Page Object Model
  13. ASP.NET Server Controls
  14. ASP.NET Working With Master Pages
  15. ASP.NET Creating Content for Master Page
  16. ASP.NET Referencing Master Page Members
  17. ASP.NET Changing Master Pages Dynamically
  18. ASP.NET Creating Nested Master Pages
  19. ASP.NET Working with Web Parts
  20. ASP.NET Using Web Parts and Controls in Web Pages
  21. ASP.NET Web Pages and Layout
  22. ASP.NET - Adding Web Parts at Run Time
  23. ASP.NET Personalization: User Profiles and Themes
  24. ASP.NET Data Access features
  25. ASP.NET State Management
  26. ASP.NET Customizing the Session State Mechanism
  27. ASP.NET State Management And Caching
  28. ASP.NET Security
  29. Forms Authentication in ASP.NET
  30. ASP.NET Managing Membership and Roles
  31. ASP.NET Configuring Page-Level Caching
  32. ASP.NET Setting Application-Level Caching
  33. ASP.NET Data Source Object Model
  34. ASP.NET SqlDataSource Control
  35. ASP.NET Data Bound Controls
  36. ASP.NET GridView Control
  37. ASP.NET GridView Filtering
  38. ASP.NET Adding Sorting and Paging in GridView
  39. ASP.NET DataBound Controls - Details View
  40. ASP.NET Using a Grid to Display Detail Information
  41. ASP.NET Displaying Master-Detail Data on the Same Page
  42. Displaying Master-Detail Data on Separate Pages in ASP.NET
  43. ASP.NET Creating Web Wizards
  44. ASP.NET : Dynamic Image control
  45. ASP.NET Advanced Site Functionality
 

Comments