Step 10. Select product license type
On the Suite Selection screen, the wizard prompts you to indicate the type of licensing agreement you have purchased from Oracle Applications. It then presents the appropriate licensing screen. Completing a licensing screen does not constitute a license agreement. It simply registers your products as active.
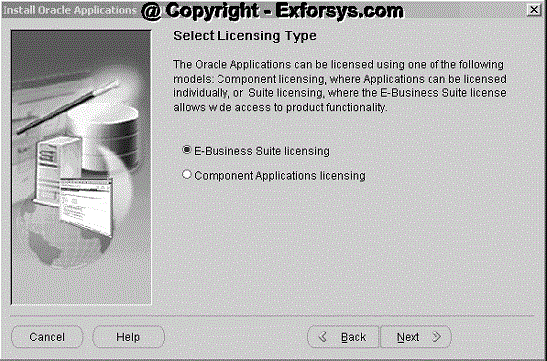
Rapid Install installs all products regardless of their licensed status. However, you must register products you have licensed so that they are flagged in the system as active. An active flag marks products for inclusion in patching and other tasks that you will perform to update and maintain your system after the initial installation. You can register products for either the E-Business Suite license model or the Component Applications license model. Complete only one licensing screen. If you clicked the E-Business Suite licensing option on the Suite Selection screen, the Licensing Page for that option appears.
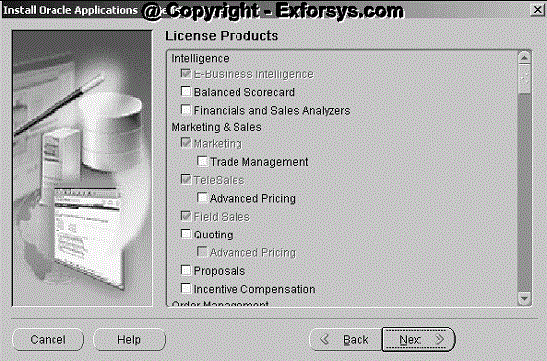
This licensing model allows wide access to Applications functionality. By choosing it, you tell Rapid Install to automatically register all products included in the E-Business Suite price bundle. The products that are checked and grayed are licensed automatically as a part of the suite. The ones that are not must be registered separately as add-on products — they are not part of the E-Business Suite price bundle. Place a check mark next to any add-on products you have licensed and want to register. If you clicked the Component Applications licensing option on the Suite Selection screen, the Licensing Page for that option appears.
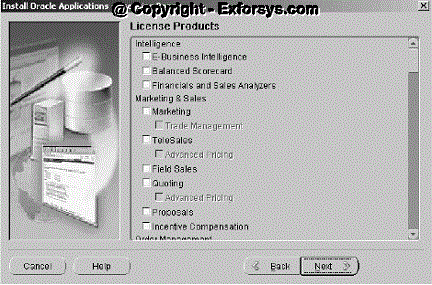
Choose this option if your’s licensing agreement is for individual Applications Component products. These products are licensed based on the number of authorized users or on the number of business transactions processed. All individual products are listed on this screen. Products that are grayed out cannot be selected unless the "parent" component is selected.
Complete the appropriate screen. Click Next to continue.
Step 11. Select country-specific functionality
Some systems require the country-specific functionality of a localized Applications product. For example, if your company operates in Canada, products such as Human Resources require additional features to accommodate the Canadian labor laws and codes that differ from those in the United States. You register the name of the region associated with the localized product on the Select Country-specific Functionalities screen.
If your company operates only in the US, you can bypass this screen. If you begin doing business in another country at a later date, you can register the associated region at any time after the initial installation or upgrade by using the OAM License Manager.
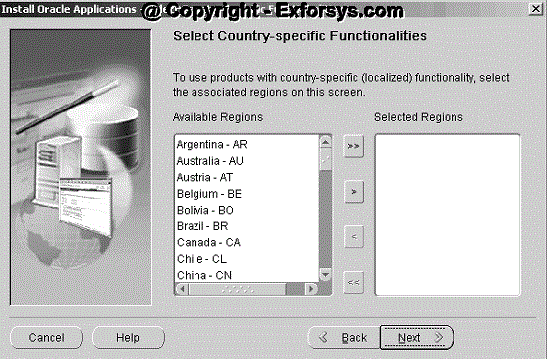
All the country-specific functionalities that Oracle supports are listed on this screen, arranged alphabetically. Double-click a region in the Available Regions box to move it into the Selected Regions box or highlight it and click the right arrow (>). To de-select a region, highlight it and double-click or click the left arrow (<) to remove it from the Selected Regions box. For example, if you select Canada, the screen would look like this.
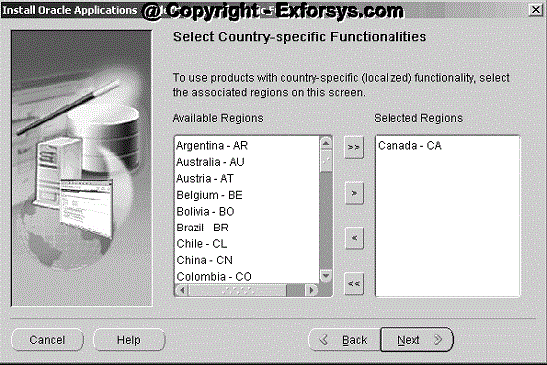
To select or de-select all the regions and move them between boxes in a single action, use the double arrows. Click Next to continue.
Step 12. Select additional languages
American English is installed in your system by default. However, Oracle Applications supports numerous other languages. Use the Select Additional Languages screen to indicate the languages required for your system. You can select any number of languages to run in a single instance.
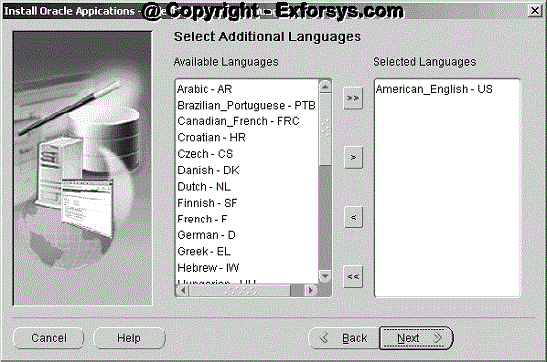
Prior to Release 11.5.9, the Rapid Install wizard registered additional languages as active – it did not actually install them. In this release, the language files will be installed in the APPL_TOP. The languages you select also determine other NLS-related configuration n parameters, such as base language, territory, and character set, your system requires.
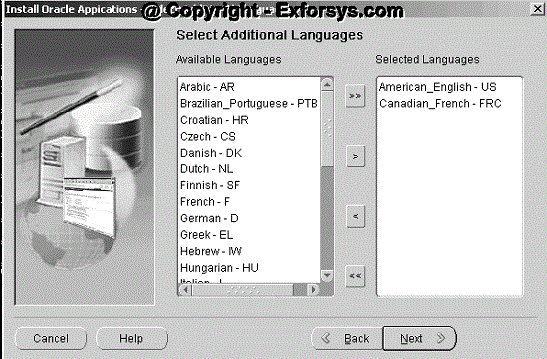
Double-click a language in the Available Languages box to move it into the Selected Languages box or highlight it and click the right arrow (>). Highlight a language in the Selected Languages box and click the left arrow (<) to remove it. The example shows Canadian French selected as an additional language. To select or de-select all languages in a single action, use the double arrows. You cannot remove American English from the Selected Languages box.
{mospagebreak}
The wizard prompts you for the location of the translated software later in the installation. You must have the Oracle Applications Release 11i NLS software available at that time.
You may need to perform additional tasks to finish the language installation. You can register additional languages any time after the initial installation or upgrade.
Click Next to continue.
Step 13. Select internationalization (NLS) settings
The Select Internationalization Settings screen derives information from the languages you entered on the Select Additional Languages screen. You use it to further define NLS configuration parameters. The NLS language and territory settings are stored as profile options in the database. They are configured at the site level when you run Rapid Install. The base language is used for the default language setting and the default territory is used for the territory profile option. Users inherit these values the first time they log on to Oracle Applications using the E-Business Suite Homepage.
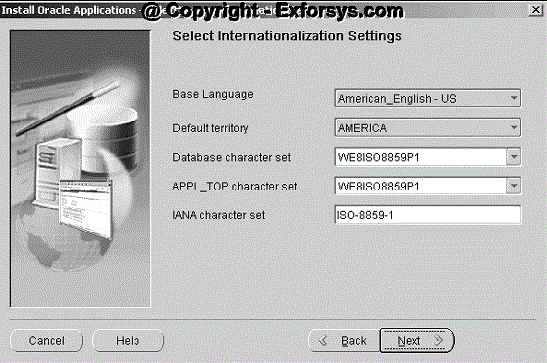
The Base Language defaults to American English. If you chose to install additional languages on the Select Additional Languages screen, they appear in the drop-down list as options. In this example, the choices are American English and Canadian French.
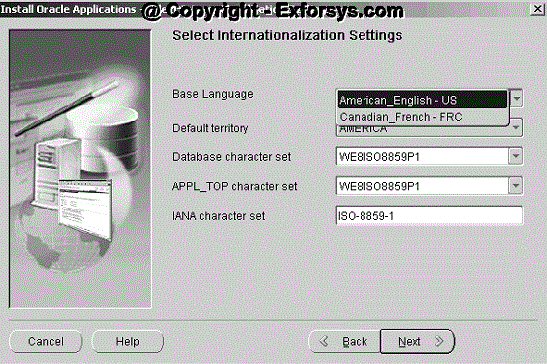
Select a base language or accept American English as the default. The "Database character set" and the "APPL_TOP character set" drop-down menus initially show US7ASCII as the default character set. Other compatible character sets are listed as well.
Step 14. Enter node-specific information
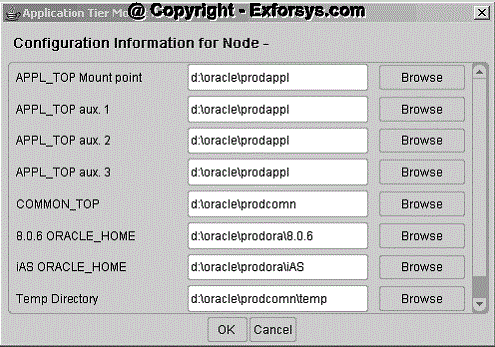
You have already specified the top-level directory and the mount points for the RDBMS. Now, you must specify top-level directory and subdirectories associated with the application tier servers. The administration server contains the files and processes used to perform patching and other maintenance tasks.
In a single-node installation, these servers are on the same node, so you can enter all the parameters on the Admin Server/Concurrent Mgr/Forms Server/Web Server screen.
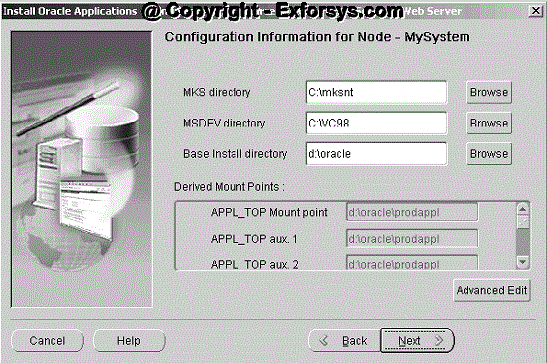
The default sample directories use the syntax of the operating system where you started Rapid Install. In addition, some of the fields are operating system-specific. The MKS directory and MSDEV directory are specific to Windows. Enter the location of the MKS tools, and the location of the Visual C/C++ executables and .DLLs, respectively. If this is a Unix or Linux system, complete the information for Apps OS User (the owner of the application tier file system and technology stack) and Apps OS Group (the group that the Apps OS User belongs to). Accept the defaults or enter new values. The Base Install directory is the top-level directory that Rapid Install will use to derive the mount points for the application tier servers on this node. You can accept the defaults or enter new values. Click Browse to navigate to a new path. Double-click the directory to select it.
Step 15. Review global settings
Rapid Install uses the values specified on the Global Settings screen to identify a qualified domain name and to derive port settings that your system will use to connect services and listeners.
Enter a valid value for the Domain Name. This value, when combined with a host name, must produce a fully qualified domain name. For example, for
For example, if you select an increment of 3 from the Port Pool list, the values in the Derived Port Settings will reflect this choice. Use the scroll bar or click Advanced Edit to see the Port Values screen.

Because you selected an increment of 3, the default values are increased by that value. The Database Port (1521) has become 1524, the RPC Port (1626) has become 1629, and so on.
Click OK save your changes and return to the Global Settings screen. Click Cancel to return to the Global Settings screen without making changes. Then, click Next to continue.
{mospagebreak}
Step 16. Save the configuration file
You have now completed all the information Rapid Install needs to set up and install a single-node system. The Save Instance-specific Configuration screen asks you to save the values you have entered in the wizard in a configuration file (config.txt or user-supplied name).
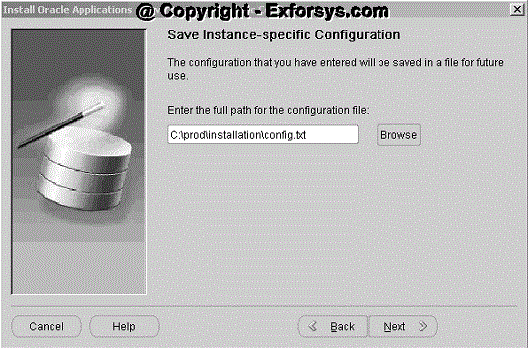
The configuration file contains all the information required to configure a specific Oracle Applications instance. Rapid Install uses these values during the installation to create the file system, install the database, and configure and start the server processes. It then stores the values in a central repository called a context file, which you can use to modify the system configuration at any time after the installation is complete. The default location of the config.txt file is the system temporary directory. It’s a good idea to choose a permanent directory location because you may use this file at a later date. Enter a directory path or click Browse.
Navigate to the new directory path. Highlight the path and double-click to select it. Click Next to continue.
Step 17. Review pre-install test checks
Rapid Install performs a series of system tests to validate the configuration described in the configuration file. On the Pre-Install Checks screen it lists the tests performed and marks each one with an indication of whether it succeeded or failed.
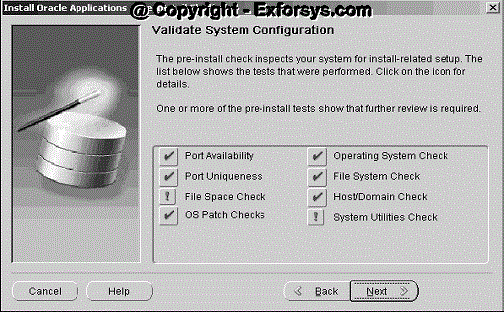
The results of each test are labeled with icons. There are three result types:
Check mark : The test succeeded.
Exclamation mark (!) : The configuration requires review. Click the ! to get information about the system test review. Click Yes to continue, and No if you are going to resolve the issues. Rapid Install displays an alert if you continue without resolving the issues.
An x mark : All issues marked x must be resolved before you continue with the installation. Click the x to see the errors. If you can resolve an issue by altering the values provided on one of the wizard screens, click Back until you reach the appropriate screen, and re-enter the values. Some tests must be resolved in the operating system. In that case, you may have to restart the Rapid Install wizard after the problem has been fixed.
When there are no issues to resolve, click Next to continue.
Step 18. Begin the installation
On the Component Installation Review screen, Rapid Install lists the components it will install, based on the system parameters you entered in the wizard. Here is an example.
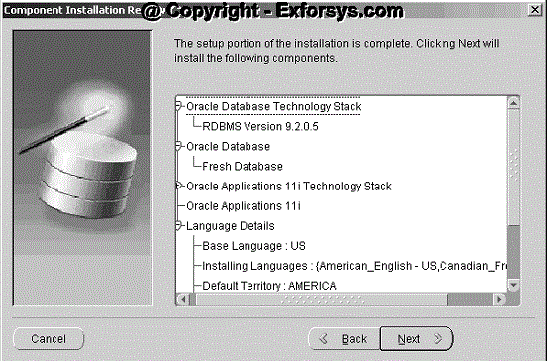
Click Next. Rapid Install displays another alert screen asking you to verify that you are ready to begin the installation.
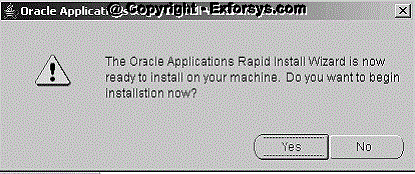
Click Yes to begin.
Status Indicators and Prompts
During an installation, Rapid Install displays a main progress bar and an individual progress bar. The main progress bar reports on the completion percentage of the installation as a whole. The individual progress bar reports on the progress of each individual step. The installation is not complete until all the progress bars disappear from your screen.
{mospagebreak}
Rapid Install requires very little user intervention. However, you may receive a prompt requesting information if any of the components are missing from the stage directory.
Step 19. Review Post-installation Tests
After the installation is complete, Rapid Install automatically validates the installed Applications environments. It tests the system for correctly configured environment files, application listeners, and database availability. It then displays the Post-install Checks screen.
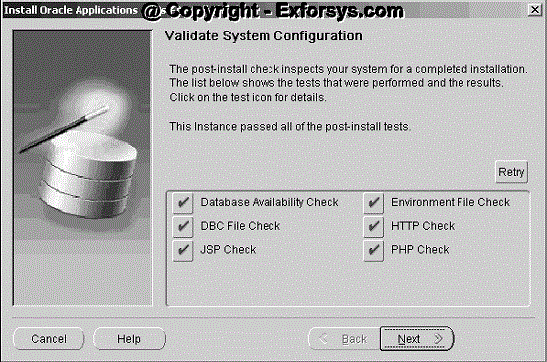
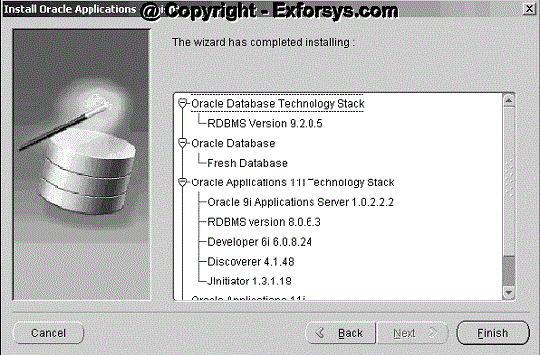
Rapid Install lists the tests it has completed. Review the information. If there is an ! or x icon, click it to see the details. If any of the checks fail, refer to the Rapid Install log files to determine the reason, and resolve each problem before continuing. When the errors are fixed, click Retry to perform the post-install validation again. Click Next if there are no errors. Rapid Install informs you of the components that it installed on the Finish screen.
Frequently Asked Questions
1. What is Rapid Install? What is it used for?
2. What are the 3 tiers used in Oracle Applications architecture?
3. What is the difference between Single-Node and Multi-Node installations?
4. What is the use of Multi Reporting Currencies in Oracle Applications?
5. What is Express Configuration in Rapid Install?
That completes the Oracle Apps 11i Single and Multi Node installation. In the next tutorial we will be learning about Application Framework, steps of registering new application in oracle applications. It also talks about the standard directory structure within oracle application.
[catlist id=183].